Tex-Mex cuisine is not classified as authentic Mexican. That doesn’t make it any less delicious. The term “fajita” has been around since the 1930’s, but the concept of grilled, and sizzling meat/vegetables wasn’t popularized until the 1990’s in Texas. Our fajitas use a humble spice mixture, and a few simple techniques on the grill to achieve restaurant quality results.
Crema is a slightly richer, and tangier, version of American Sour Cream. If you can find real crema in a Mexican market, or grocery store, by all means please use it! However, our Get Cheffy crema is ready in 2-3 minutes, using ingredients you can find in any supermarket.
FOR THE FAJITAS:
- 4 Large Bell Peppers (we used a combination of green, yellow and orange)
- 1 Large (or 2/3 small/medium) Red Onion(s)
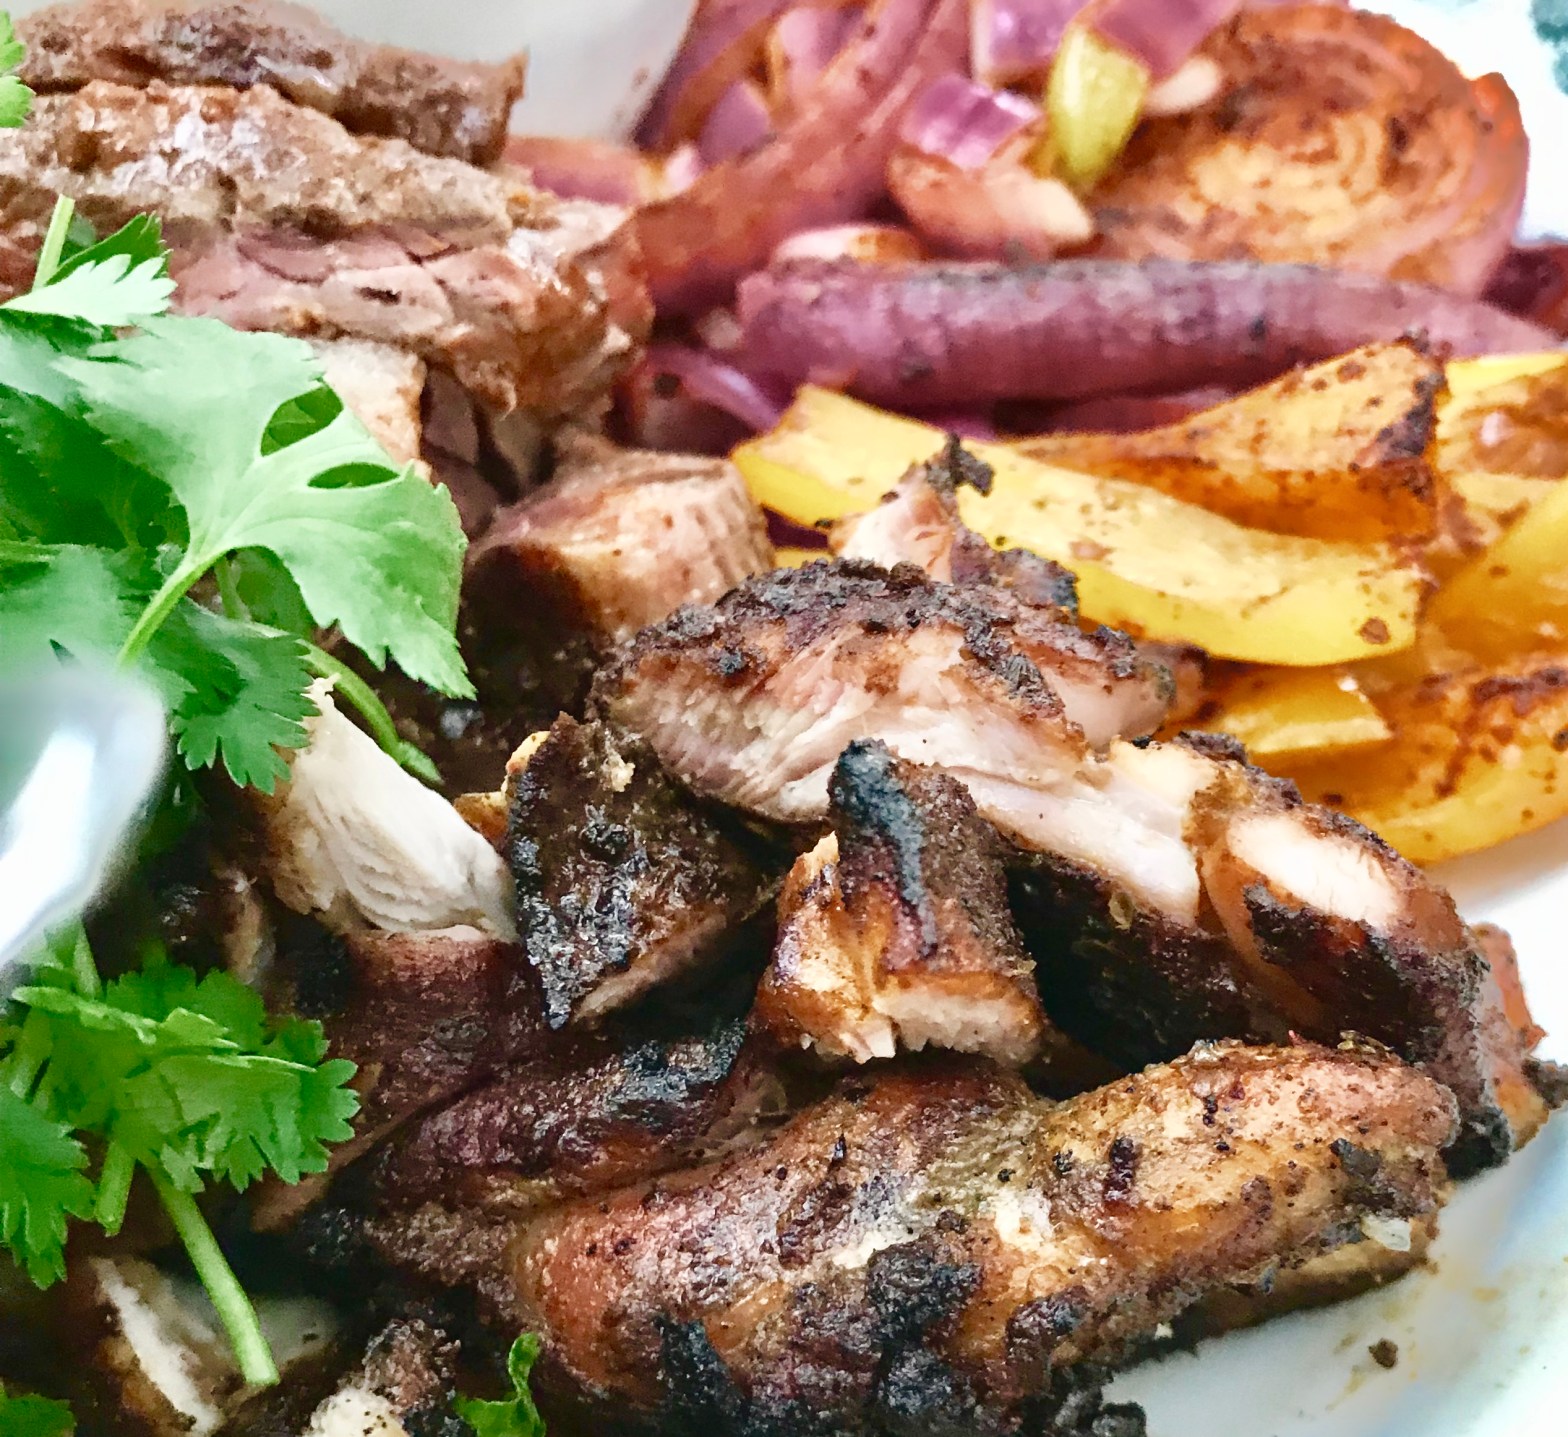
- 1-2 pound(s) skirt, flank, or strip steak(s)
- 2-3 pounds boneless, skinless, Chicken Thighs
- Wanna save some money? Buy bone-in, skin-on Chicken Thighs, and remove the skins and thigh bones yourself (save all scraps of bone and fat in your chicken stock freezer bag to make Get Cheffy House Made Stock). You’ll notice a significant reduction in price. Remove the skins with a paper towel, and remove the bones with a sharp chef’s knife by sliding the knife down both sides of the thigh, until the bone is exposed enough to remove.
- 1 Tablespoon Chili Powder
- 1 Tablespoon Paprika
- 1 Tablespoon Cumin
- 1 Teaspoon Onion Powder
- 1 Teaspoon Garlic Powder
- 2 Teaspoons Dried Oregano
- 1 Teaspoon Cayenne
- 1/4 Teaspoon Cinnamon
- 2 Teaspoons Salt
- 2 Teaspoons Ground Black Pepper
- 4-5 Tablespoons Vegetable Oil
- 1/2 Tablespoon Honey
- 4-5 Limes
GET CHEFFY TIP!– “What’s with all the chicken thighs I’m seeing on Get Cheffy?” We use thigh meat over breast meat because of its economical price, richer flavor, and forgiving cooking times (it’s almost impossible to overcook chicken thighs). The “anti-fat” movement of the 1980’s/1990’s popularized leaner cuts of pork, chicken, and beef, as well as low fat dairy products (which you won’t find on Get Cheffy). Chicken breasts, especially those with the skin removed, are the leanest cuts of poultry, with almost 0% residual fat. This low-fat cut of chicken means the breast meat will overcook quickly, and have less taste than a cut from a dark meat area, like the thigh. Try swapping out chicken thighs in any recipe that calls for chicken breasts, and you’ll be astonished at the difference in flavor. Thigh meat wants to be cooked longer than breast meat, so double, or triple, the amount of cooking time recommended if you’re swapping in thighs for breast meat.
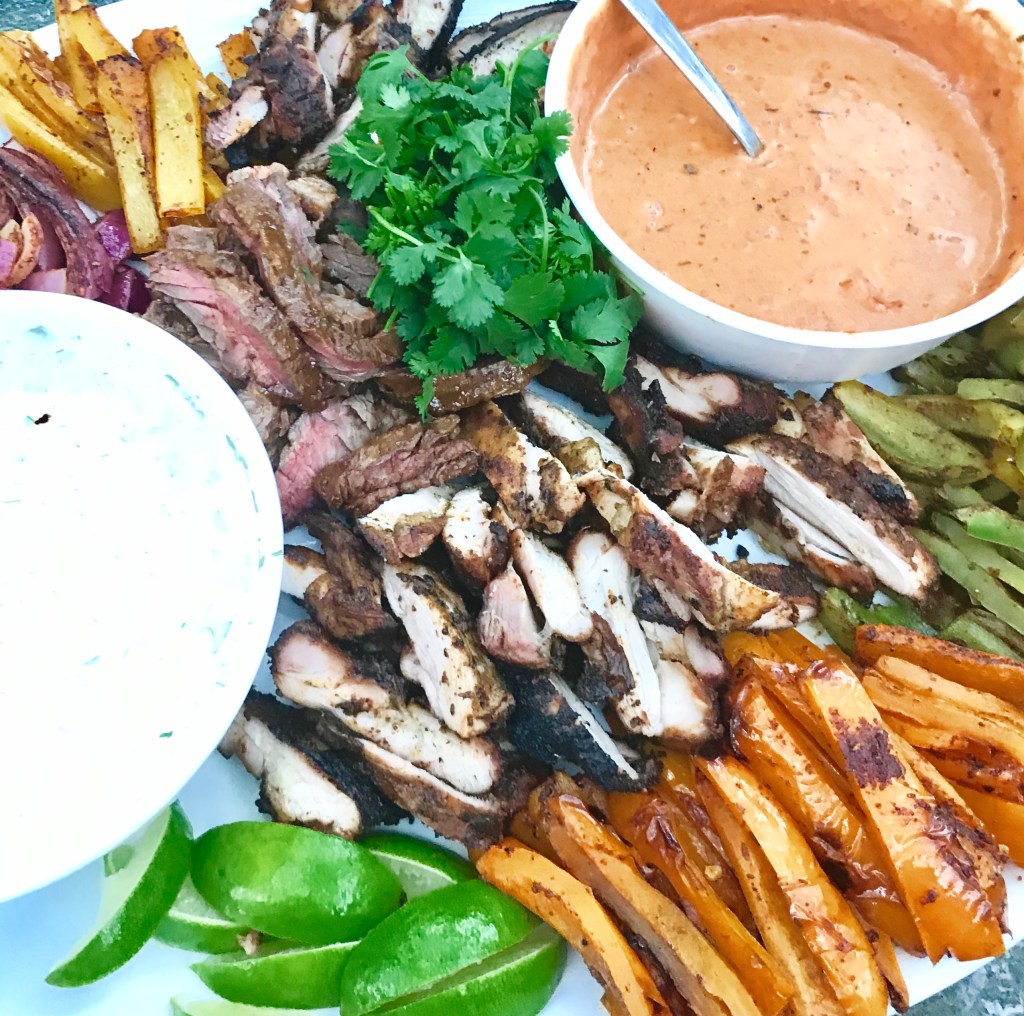
FOR THE CILANTRO CREMA:
- 1 1/2 Cups Sour Cream
- 2 Tablespoons Mayonnaise
- 2 Limes, juiced (about 4 Tablespoons Lime juice)
- 1 teaspoon minced garlic
- 3 tablespoons roughly chopped cilantro
- Begin by combining your chili powder, paprika, cumin, onion powder, garlic powder, cayenne, cinnamon, salt, and ground pepper in a mixing bowl. Whisk to combine your dried spices.
- Reserve 1 1/2 tablespoons of your dry mixture in a separate bowl. Cover and set aside. This will be used to season your peppers and onions later.
- Whisk in 4-5 tablespoons vegetable oil, and 1/2 tablespoon honey into your remaining dry seasoning mix. Place your chicken thighs and steak in separate bowls, or separate ziplock bags, and pour 2/3 of your marinade mixture over your chicken thighs, and the remaining 1/3 over your steak. Refrigerate for at least 4 hours, or up to 2 days.
- Make the cilantro crema next, as the flavors improve the longer they sit. Pour your lime juice into the bowl of a food processor fitted with a steel blade. Add your teaspoon of minced garlic, and allow the garlic to sit in the acidic lime juice for 10 minutes. After 10 minutes, add your sour cream, mayonnaise and cilantro. Blend all ingredients together in your food processor for 10-15 seconds. After 10-15 seconds, stop your food processor and scrape down the sides of the bowl with a spatula. Taste your crema at this point, and adjust as needed with more lime juice. Add up to 1 teaspoon salt, and 1-2 teaspoons ground black pepper, and blend your crema again for another 5-10 seconds. Pour into a bowl, and refrigerate until ready to eat.
GET CHEFFY TIP– A Chipotle crema is an excellent variation on our Get Cheffy Cilantro Crema. Many have an aversion to Cilantro (claiming it has a “soapy taste”). You can easily omit the Cilantro from the crema (making a plain, non-cilantro infused version), but you can also create a delicious, Chipotle crema. To make a Chipotle crema, remove the cilantro completely, and add one tablespoon chipotle adobo (the liquid that your chipotle peppers are packed in), and 2 teaspoons honey; follow the remaining steps as normal.

- When your’e ready to begin grilling, remove the chicken, and steak from the fridge. All meats, poultry, and seafood cook best when allowed to shake off some of the chill from the fridge.
- FOR A CHARCOAL GRILL:
- Light a full charcoal chimney. After about 15-20 minutes, you’ll begin to see light, gray ash appearing along the edges of your coals. Dump your coals into your pit, banked onto just one side of your grill. Your goal is to create a “hot-zone” and a “cool zone”
- FOR A GAS GRILL:
- Turn all burners of your gas grill on high, and close the lid. Allow your grill to heat up, 5-10 minutes, before opening the lid, and scraping down the grates. Once your grill grates are clean, turn off one side of your burners completely and reduce the heat of your second side to medium/high.
- FOR A CHARCOAL GRILL:
- When your grill is ready, ensure that you’ve scraped down your grates, and oiled them to prevent sticking. Place all chicken thighs in your “hot-zone”, directly over your coals, or burners. In as little as 3 minutes, take a look at your chicken; the direct, immediate heat will begin to crisp and char the exterior of the chicken thighs. Flip each chicken thigh, rearranging if needed, and cook over the “hot-zone” for another 2-4 minutes. At this point, your chicken will look beautiful (grill marks and all), but won’t be cooked. Move all thighs to your “cool-zone”, away from the coals, and burners. Cover your grill with its lid and place the air vents, with the air grates fully opened, directly over your chicken. Allow to cook for another 30 minutes in this indirect heat.
- While your thighs cook, turn to your vegetables. Begin by prepping your peppers. You won’t want to slice your vegetables into thin strips just yet. Instead, cut off the tops of your peppers, and a small sliver off the bottom. Standing the pepper on its, now flat, bottom, slice the whole thing in half. From here, you can easily remove the seeds, and ribs of your pepper(s). Your goal is to create large pieces/planks that can rest on a grill grate without falling through. Place your peppers onto a sheet tray, and break down your onion(s) next. Think of an onion as a globe with the bulb end as the North Pole, and the root end (the part with the scraggly looking hairs/roots), as the South Pole. Trim off the “North Pole” and “South Pole”, and remove any outer, damaged layers. Your goal is to create large-ish planks (1/2-1 inch thick). Continue slicing your onion along its “equator”, in the same slicing direction you removed the “poles”. A large onion should yield 4-5 individual sections; smaller onions 3-4. You don’t want your onion slices too thin, as the layers like to separate on the grill; slicing your onion(s) too thin encourages the layers to pull apart when grilling, which is maddening…

- Place your onions on the sheet tray with your peppers. Gently brush all vegetables with vegetable oil; gently flip, and do the same on the other side. Once all sides of your vegetables are coated with oil, begin to sprinkle your remaining 1 1/2 tablespoons of reserved seasoning over your vegetables. Use half on the first side, flip your vegetables, and use the remaining half on the other side until all areas of your vegetables are coated with oil, and seasoning.
- After the chicken has cooked for 30 minutes, remove the grill lid and place all of your peppers directly over your coals/burners in the “hot-zone”. Place your onion planks close as you can to your peppers, and allow them to cook alongside. Depending on the strength left in your coals, or the strength of your burners if using a gas grill, your vegetables may begin to develop charring on their outer skins in as little as 3 minutes. Check your vegetables (focusing on the ones directly over your coals first) after the initial 3 minutes to determine any additional cooking time needed. If your vegetables haven’t obtained any charring on their skins after the first 3 minutes, allow to cook for 2 minutes more, and check again. Continue to check your vegetables every 2 minutes until you’ve achieved even charring. Don’t flip your vegetables until you see spotty blackening appear on the exterior of the pepper skins. Once you see slight charring appear, carefully flip your peppers and onions using tongs and a spatula; the onions will try to separate, so a wide spatula is perfect here. We used a charcoal grill, with our vegetables cooking directly over the coals for 7-9 minutes per side (for a total cooking time of 14-18 minutes).
- Once your peppers and onions have char marks on all sides, and have softened, move them over to the cool side of your grill, with your chicken. You can stack your chicken thighs on top of each other to make more room; stack your cooked vegetables too, if need be.
- With you “hot-zone” now empty, take your steak, and place directly over your coals/burners to begin charring. Depending on the thickness of your steak, and how done you like your beef, cook anywhere from 4-6 minutes per side. We used a thin (1/2 inch thick) skirt steak and cooked it roughly 3 minutes per side; this yielded a medium/medium well interior; cook your steak longer based on your preference.
- Once your steak if cooked, take two lime halves and squeeze one half directly over the steak, and the other half squeezed directly over the chicken. Place your thighs, vegetables, and steak back onto your sheet tray, and transfer to a cutting board. Beginning with your vegetables, slice your peppers and onions into the traditional strips for fajitas. Repeat these steps with your chicken, and then finally your steak. Arrange your meats and vegetables on a platter with your crema. Serve with rice, lime wedges, extra cilantro, and tortillas. We served ours with all the trimmings and accoutrements, including queso.


One thought on “Grilled Fajitas with Cilantro Crema”